Introduction
Welcome to YallaPush
YallaPush is the next-generation push notification platform — engineered for scale, designed for developers, and built for businesses that demand excellence. It combines the reliability of Firebase Cloud Messaging (FCM) with an intuitive API and enterprise-grade delivery for seamless cross-platform communication.
Lightning Fast
Instant notification delivery with 99.99% uptime and global low latency.
Smart Segmentation
Advanced targeting with AI-powered user segmentation and personalization.
Universal Platform
Seamless support for iOS, Android, Web, Flutter, and React Native apps.
Firebase Setup Guide
Configure Firebase for your YallaPush integration with this clear, step-by-step guide.
Create Firebase Project
- Navigate to Firebase Console
- Click “Add project” or “Create a project”
- Enter a project name (e.g.
YallaPush Enterprise) - Configure Google Analytics (optional but recommended)
- Wait for project creation and click Continue

Add Android Application
- Click the Android icon in your Firebase dashboard
- Enter your Android package name (e.g.
com.yourcompany.app) - Add app nickname and SHA-1 certificate (optional)
- Download google-services.json
- Place it inside
android/app/directory

Add iOS Application
- Click the iOS icon in your Firebase dashboard
- Enter your iOS bundle ID (e.g.
com.yourcompany.app) - Download GoogleService-Info.plist
- Add it to your Xcode project
- Enable “Push Notifications” in Xcode capabilities

Enable Cloud Messaging
- Go to Project Settings → Cloud Messaging
- Note your Server key and Sender ID
- For iOS: Upload your APNs Authentication Key (.p8)
- Configure Web Push certificates for web apps

Generate Service Account
- Navigate to Project Settings → Service Accounts
- Click “Generate new private key”
- Download and store the JSON securely
- Use this file for backend authentication

Configuration Files Reference
| Platform | File Name | Location | Purpose |
|---|---|---|---|
| Android | google-services.json | android/app/ | Android device registration & FCM setup |
| iOS | GoogleService-Info.plist | Xcode project root | iOS device registration & APNs configuration |
| Backend | Service Account JSON | Secure server storage | Server authentication & notification sending |
| Web | Firebase Config Object | Web app code | Browser push notifications & FCM initialization |
React Native Push Notifications Integration
Integrate Firebase Cloud Messaging (FCM) in a React Native app and connect it with YallaPush for cross-platform push notifications.
Prerequisites
- React Native CLI or Expo Bare Workflow.
- Firebase project with Android + iOS apps added.
google-services.json(Android) andGoogleService-Info.plist(iOS).
Install Dependencies
npm install @react-native-firebase/app @react-native-firebase/messaging
Android Setup
Place google-services.json inside android/app/.
// android/build.gradle
buildscript {
  dependencies {
    classpath 'com.google.gms:google-services:4.3.15'
  }
}

// android/app/build.gradle
apply plugin: 'com.google.gms.google-services'

dependencies {
  implementation platform('com.google.firebase:firebase-bom:32.2.0')
  implementation 'com.google.firebase:firebase-messaging'
}
Add permission for Android 13+:
<uses-permission android:name="android.permission.POST_NOTIFICATIONS"/>
iOS Setup
- Add
GoogleService-Info.plistto Xcode project. - Enable Push Notifications + Background Modes (Remote notifications).
- Install pods:
cd ios && pod install
Request Permission & Get Token
import React, { useEffect } from "react";
import { Platform } from "react-native";
import messaging from "@react-native-firebase/messaging";

async function registerDevice() {
  const authStatus = await messaging().requestPermission();
  const enabled =
    authStatus === messaging.AuthorizationStatus.AUTHORIZED ||
    authStatus === messaging.AuthorizationStatus.PROVISIONAL;

  if (!enabled) {
    console.log("Push permission not granted");
    return;
  }

  const token = await messaging().getToken();
  console.log("FCM Token:", token);

  await fetch("https://api.yallapush.com/device/register", {
    method: "POST",
    headers: { "Content-Type": "application/json" },
    body: JSON.stringify({
      device_token: token,
      platform: Platform.OS,
      user_id: "12345"
    })
  });
}

export default function App() {
  useEffect(() => {
    registerDevice();
  }, []);

  return null;
}
Handle Foreground & Background Messages
// Foreground
useEffect(() => {
  const unsubscribe = messaging().onMessage(async remoteMessage => {
    console.log("Message in foreground:", remoteMessage);
  });
  return unsubscribe;
}, []);

// Background & quit state
messaging().setBackgroundMessageHandler(async remoteMessage => {
  console.log("Message in background:", remoteMessage);
});
Handle Token Refresh
messaging().onTokenRefresh(token => {
  fetch("https://api.yallapush.com/device/register", {
    method: "POST",
    headers: { "Content-Type": "application/json" },
    body: JSON.stringify({ device_token: token, platform: Platform.OS })
  });
});
Testing
- Run on a physical Android/iOS device.
- Check console for FCM token.
- Send test notification from Firebase Console → Cloud Messaging.
- Verify push received & token in YallaPush dashboard.
Best Practices
- Always handle
onTokenRefreshto keep YallaPush updated. - Use data payloads for deep links/custom actions.
- On iOS, ensure APNs is enabled with correct certificates/keys.
- On Android 13+, request runtime notification permission.
Android (Kotlin) Push Notifications Integration
Implement Firebase Cloud Messaging (FCM) in your Android app and connect it with YallaPush for push notifications.
Prerequisites
- Firebase project set up with Android app registered.
google-services.jsonplaced insideapp/.- Android Studio with SDK installed (physical device recommended).
Gradle Setup
// project/build.gradle
buildscript {
  dependencies {
    classpath 'com.google.gms:google-services:4.3.15'
  }
}

// app/build.gradle
plugins {
  id 'com.android.application'
}
dependencies {
  implementation platform('com.google.firebase:firebase-bom:32.2.0')
  implementation 'com.google.firebase:firebase-messaging'
}
apply plugin: 'com.google.gms.google-services'
AndroidManifest Setup
<uses-permission android:name="android.permission.POST_NOTIFICATIONS"/>

<service android:name=".MyFirebaseMessagingService">
  <intent-filter>
    <action android:name="com.google.firebase.MESSAGING_EVENT"/>
  </intent-filter>
</service>
Application Class
class MyApplication : Application() {
  override fun onCreate() {
    super.onCreate()
    FirebaseMessaging.getInstance().token.addOnCompleteListener { task ->
      if (!task.isSuccessful) return@addOnCompleteListener
      val token = task.result
      token?.let { registerWithYallaPush(it) }
    }
  }
  private fun registerWithYallaPush(token: String) {
    // send token to YallaPush API
  }
}
FirebaseMessagingService
class MyFirebaseMessagingService : FirebaseMessagingService() {
  override fun onNewToken(token: String) {
    registerWithYallaPush(token)
  }
  override fun onMessageReceived(remoteMessage: RemoteMessage) {
    val notification = remoteMessage.notification
    notification?.let {
      showNotification(it.title ?: "", it.body ?: "")
    }
  }
}
Android 13+ Runtime Permission
if (Build.VERSION.SDK_INT >= Build.VERSION_CODES.TIRAMISU) {
  ActivityCompat.requestPermissions(this,
    arrayOf(Manifest.permission.POST_NOTIFICATIONS),
    REQUEST_CODE)
}
Testing
- Run app on a physical Android device.
- Check logcat for FCM token.
- Send test notification from Firebase Console → Cloud Messaging.
- Verify push notification and token in YallaPush dashboard.
Best Practices
- Always handle token refresh and update YallaPush backend.
- Test on physical devices, not emulators (notifications may fail).
- Use
datapayloads for deep links/custom logic. - Request runtime notification permission on Android 13+.
iOS Push Notifications Integration
Integrate Firebase Cloud Messaging (FCM) with your iOS app and connect it to YallaPush for push notifications.
Prerequisites
- Firebase project with iOS app registered.
- Add
GoogleService-Info.plistto your Xcode project. - Enable Push Notifications and Background Modes → Remote notifications in Xcode.
- Physical iOS device (simulators don’t support push).
Install Dependencies
cd ios && pod install
AppDelegate Setup
import UIKit
import Firebase
import UserNotifications

@UIApplicationMain
class AppDelegate: UIResponder, UIApplicationDelegate {
  func application(_ application: UIApplication,
    didFinishLaunchingWithOptions launchOptions: [UIApplication.LaunchOptionsKey: Any]?) -> Bool {
    FirebaseApp.configure()
    UNUserNotificationCenter.current().delegate = self
    application.registerForRemoteNotifications()
    return true
  }
}

extension AppDelegate: UNUserNotificationCenterDelegate {
  func userNotificationCenter(_ center: UNUserNotificationCenter,
    willPresent notification: UNNotification,
    withCompletionHandler completionHandler: @escaping (UNNotificationPresentationOptions) -> Void) {
    completionHandler([.alert, .sound, .badge])
  }
}
Get FCM Token
Messaging.messaging().token { token, error in
  if let error = error {
    print("Error fetching FCM token: \(error)")
  } else if let token = token {
    print("FCM Token: \(token)")
    // Send token to YallaPush
  }
}
Testing
- Run on a physical iPhone/iPad (not simulator).
- Check Xcode logs for FCM token.
- Send test push from Firebase Console → Cloud Messaging.
- Verify delivery & token in YallaPush dashboard.
Best Practices
- Ensure APNs keys/certificates are correctly configured in Firebase.
- Handle
Messaging.messaging().tokenrefresh to update backend. - Always test on physical devices.
Flutter Push Notifications Integration (YallaPush + FCM)
This guide explains how to integrate Firebase Cloud Messaging (FCM) into a Flutter app and connect it with YallaPush for seamless cross-platform push notifications.
Prerequisites
- Flutter SDK installed (stable version).
- Firebase project with iOS + Android apps registered.
google-services.json(Android) &GoogleService-Info.plist(iOS).- Physical device (push does not work reliably on emulators).
Step 1 — Add Dependencies
# pubspec.yaml
dependencies:
  firebase_core: ^2.4.0
  firebase_messaging: ^14.2.0
  http: ^0.13.5
Step 2 — Initialize Firebase
// main.dart
import 'package:flutter/material.dart';
import 'package:firebase_core/firebase_core.dart';
import 'package:firebase_messaging/firebase_messaging.dart';
import 'package:http/http.dart' as http;
import 'dart:convert';

Future<void> _firebaseMessagingBackgroundHandler(RemoteMessage message) async {
  await Firebase.initializeApp();
  print("Handling a background message: ${message.messageId}");
}

Future<void> main() async {
  WidgetsFlutterBinding.ensureInitialized();
  await Firebase.initializeApp();

  FirebaseMessaging.onBackgroundMessage(_firebaseMessagingBackgroundHandler);

  runApp(MyApp());
}

class MyApp extends StatelessWidget {
  @override
  Widget build(BuildContext context) {
    return MaterialApp(
      title: 'YallaPush Demo',
      home: HomePage(),
    );
  }
}
Step 3 — Request Permission (iOS)
FirebaseMessaging messaging = FirebaseMessaging.instance;
NotificationSettings settings = await messaging.requestPermission(
  alert: true,
  badge: true,
  sound: true,
);

if (settings.authorizationStatus == AuthorizationStatus.authorized) {
  print("Push permission granted");
} else {
  print("Push permission denied");
}
Step 4 — Register Device with YallaPush
class HomePage extends StatefulWidget {
  @override
  _HomePageState createState() => _HomePageState();
}

class _HomePageState extends State<HomePage> {
  @override
  void initState() {
    super.initState();
    initPush();
  }

  void initPush() async {
    FirebaseMessaging messaging = FirebaseMessaging.instance;
    String? token = await messaging.getToken();

    if (token != null) {
      final response = await http.post(
        Uri.parse("https://api.yallapush.com/device/register"),
        headers: {"Content-Type": "application/json"},
        body: jsonEncode({
          "device_token": token,
          "platform": "flutter",
          "user_id": "12345"
        }),
      );
      print("Registered with YallaPush: ${response.body}");
    }

    // Foreground messages
    FirebaseMessaging.onMessage.listen((RemoteMessage message) {
      print("Foreground message: ${message.notification?.title}");
    });

    // When app is opened from background
    FirebaseMessaging.onMessageOpenedApp.listen((RemoteMessage message) {
      print("Opened from notification: ${message.data}");
    });
  }

  @override
  Widget build(BuildContext context) {
    return Scaffold(
      body: Center(child: Text("YallaPush Connected 🚀")),
    );
  }
}
Step 5 — Android Setup
- Place
google-services.jsoninsideandroid/app/. - Edit
android/build.gradle:
buildscript {
  dependencies {
    classpath 'com.google.gms:google-services:4.3.15'
  }
}
And in android/app/build.gradle:
apply plugin: 'com.google.gms.google-services'
For Android 13+, add this permission inside AndroidManifest.xml:
<uses-permission android:name="android.permission.POST_NOTIFICATIONS"/>
Step 6 — iOS Setup
- Add
GoogleService-Info.plistto your Xcode project (Runner target). - Enable Push Notifications + Background Modes → Remote notifications.
- Run
cd ios && pod install.
Step 7 — Testing
- Run the app on a real device.
- Check debug console for
FCM Token. - Send a test notification via Firebase Console → Cloud Messaging.
- Confirm token registration in the YallaPush dashboard.
Best Practices
- Always implement
onTokenRefreshto update YallaPush. - For Android 8+, create a notification channel for proper delivery.
- On iOS, ensure APNs is correctly set up in Apple Developer Account.
- Use
data payloadsfor deep linking & advanced flows.
Web Push Notifications Integration
Implement Firebase Cloud Messaging (FCM) in a web app and connect with YallaPush to send browser push notifications.
Prerequisites
- Firebase project with Web App registered.
- Add
firebase-messaging-sw.jsat project root. - Modern browsers (Chrome, Edge, Firefox, Safari).
Install Dependencies
npm install firebase
Firebase Setup
// firebase.js
import { initializeApp } from "firebase/app";
import { getMessaging, getToken, onMessage } from "firebase/messaging";

const firebaseConfig = {
  apiKey: "...",
  authDomain: "...",
  projectId: "...",
  storageBucket: "...",
  messagingSenderId: "...",
  appId: "..."
};

const app = initializeApp(firebaseConfig);
export const messaging = getMessaging(app);
Request Permission & Get Token
import { getToken } from "firebase/messaging";
import { messaging } from "./firebase";

async function registerDevice() {
  try {
    const token = await getToken(messaging, {
      vapidKey: "YOUR_PUBLIC_VAPID_KEY"
    });
    console.log("FCM Token:", token);

    await fetch("https://api.yallapush.com/device/register", {
      method: "POST",
      headers: { "Content-Type": "application/json" },
      body: JSON.stringify({ device_token: token, platform: "web" })
    });
  } catch (err) {
    console.error("Error getting token:", err);
  }
}

registerDevice();
firebase-messaging-sw.js
// firebase-messaging-sw.js
importScripts("https://www.gstatic.com/firebasejs/10.7.1/firebase-app.js");
importScripts("https://www.gstatic.com/firebasejs/10.7.1/firebase-messaging.js");

firebase.initializeApp({
  apiKey: "...",
  authDomain: "...",
  projectId: "...",
  storageBucket: "...",
  messagingSenderId: "...",
  appId: "..."
});

const messaging = firebase.messaging();
Testing
- Run app over HTTPS (localhost is allowed).
- Open browser console → check for FCM token.
- Send test notification from Firebase Console.
- Verify push received & token in YallaPush dashboard.
Best Practices
- Use
onMessageto handle foreground messages. - Serve app with HTTPS (mandatory for push).
- Handle
onTokenRefreshfor consistent delivery.
Handle Foreground & Background Messages
// Foreground
useEffect(() => {
  const unsubscribe = messaging().onMessage(async remoteMessage => {
    console.log("Message in foreground:", remoteMessage);
  });
  return unsubscribe;
}, []);

// Background & quit state
messaging().setBackgroundMessageHandler(async remoteMessage => {
  console.log("Message in background:", remoteMessage);
});
Handle Token Refresh
messaging().onTokenRefresh(token => {
  fetch("https://api.yallapush.com/device/register", {
    method: "POST",
    headers: { "Content-Type": "application/json" },
    body: JSON.stringify({ device_token: token, platform: Platform.OS })
  });
});
Mobile Testing
- Run on a physical Android/iOS device.
- Check console for FCM token.
- Send test notification from Firebase Console → Cloud Messaging.
- Verify push received & token in YallaPush dashboard.
Mobile Best Practices
- Always handle
onTokenRefreshto keep YallaPush updated. - Use data payloads for deep links/custom actions.
- On iOS, ensure APNs is enabled with correct certificates/keys.
- On Android 13+, request runtime notification permission.
YallaPush API Reference
Base URL: https://api.yallapush.com/api/neutonsoft-yallapush/v1
These endpoints may interact with third-party services for enhanced functionality:
- Firebase Cloud Messaging (FCM) — for sending push notifications to registered devices.
- Email Notification Service — for sending email notifications to users.
Device Registration
Use this endpoint to register one or more devices with your project. Each device must include its unique token, platform details, and optionally user information. A valid projectApiKey is required.
Endpoint
- POST
/register-devices
Headers
Content-Type: application/json
Request Example
POST /register-devices
Content-Type: application/json

{
  "projectApiKey": "YOUR_PROJECT_API_KEY",
  "devices": [
    {
      "fcmtoken": "fcm-device-token",
      "platform": "android",
      "deviceInfo": {
        "model": "Pixel 6",
        "os": "Android 12"
      },
      "userInfo": {
        "email": "user@example.com",
        "name": "User Name"
      },
      "isUserLoggedIn": true
    }
  ]
}
Success Response
{
  "status": "success",
  "registered": 1
}
Email Notifications
Use this endpoint to send email notifications directly to your users. Provide the recipient's email, subject, and message body. A valid x-verification-token header is required for authentication.
- POST
/send-notification-by-email— send notification via email
Request Example
POST /send-notification-by-email
Content-Type: application/json
x-verification-token: your_verification_token_here

{
  "to": "user@example.com",
  "subject": "Test Notification",
  "message": "Hello, this is a test email notification"
}
Response Example
{
  "success": true,
  "message": "Email notification sent successfully"
}
How to Delete Account
Follow these steps to permanently delete an account and all associated data, organizations, users, and roles. This action is irreversible.
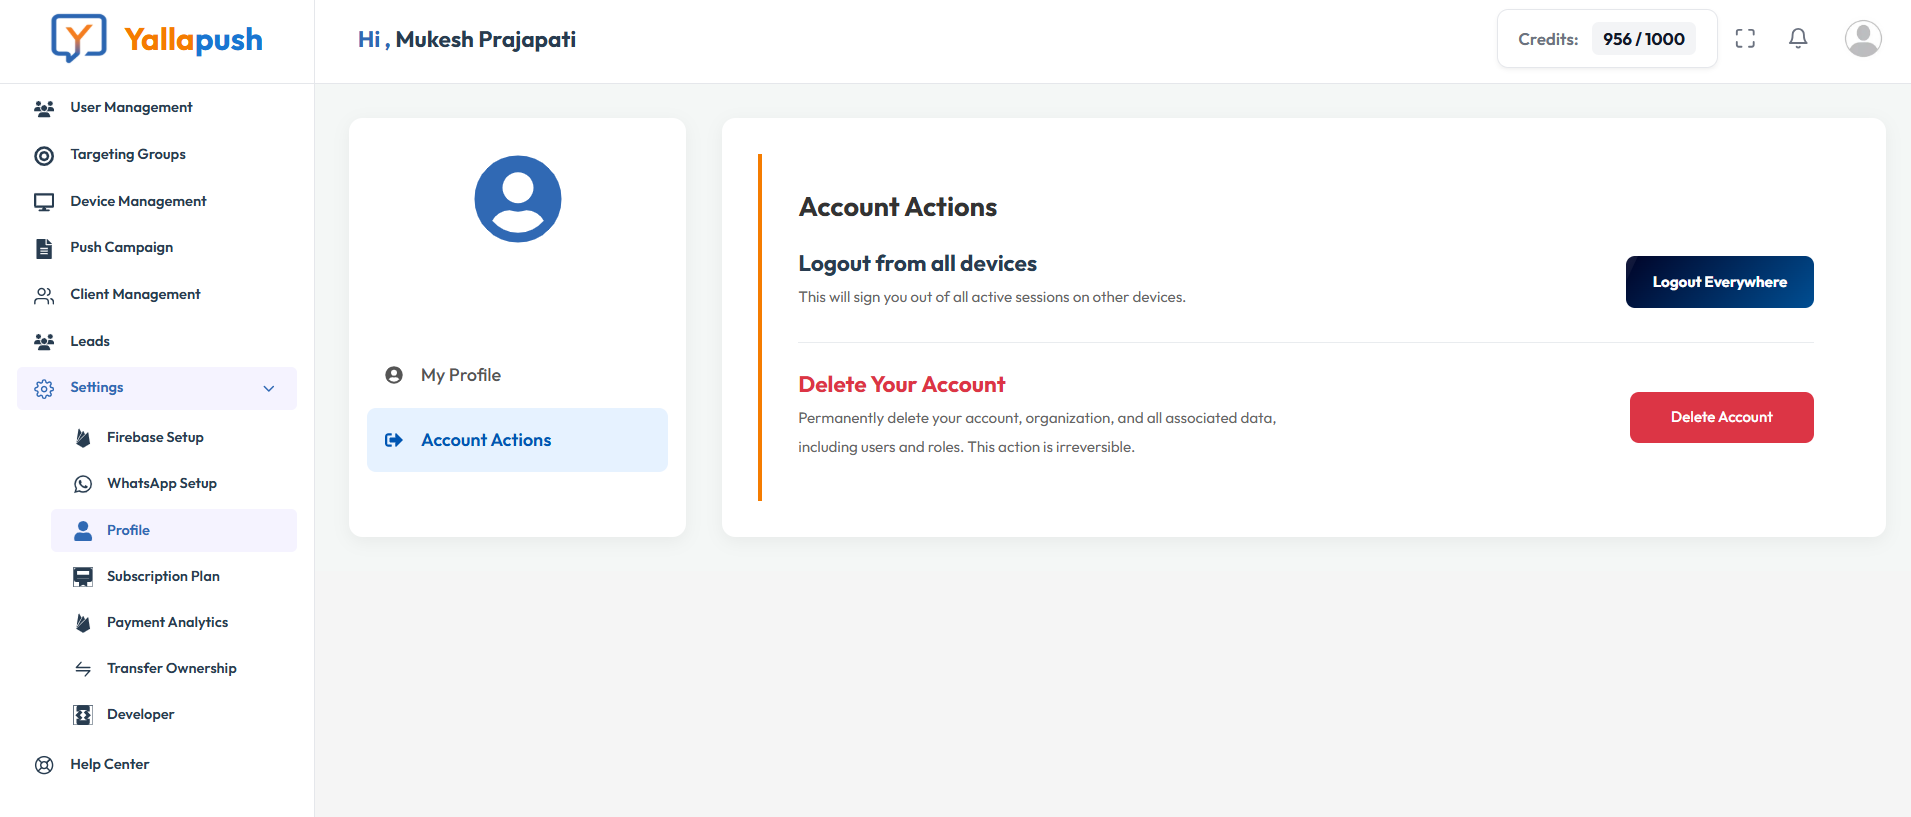
Step 1: Navigate to Account Actions
Navigate to Settings → Profile → Account Actions, then click the Delete Account button.
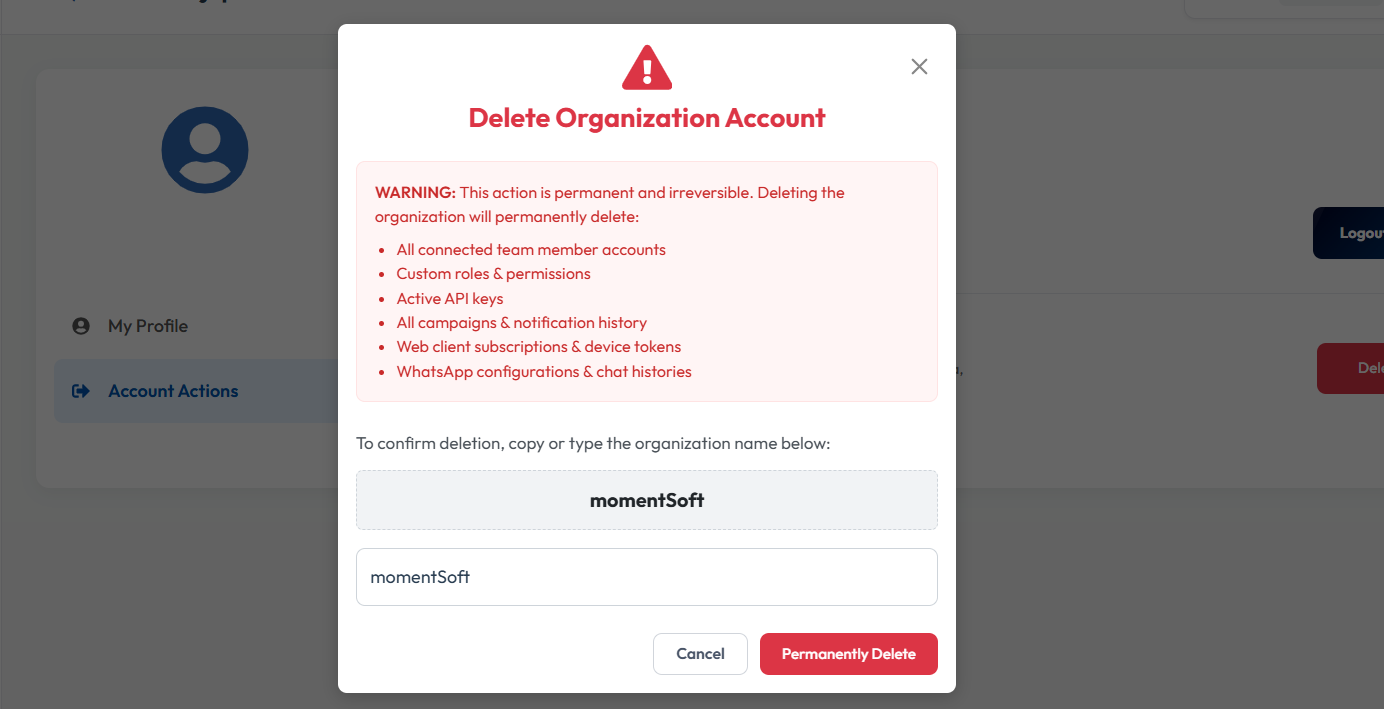
Step 2: Confirm Deletion
A confirmation modal will appear asking you to type your organization name to prevent accidental deletion.
Enter the exact organization name (or your account name) in the input box and click Delete.
Step 3: Automatic Logout
After a successful deletion cycle, your active session tokens are revoked, and you will be immediately logged out from all active device clients.
Delete Account API
Submit a secure API request with the required authentication tokens and verification headers to permanently delete your account and clear all associated records.
POST /organization/delete-account
Content-Type: application/json
Authorization: Bearer your_jwt_access_token_here
x-verification-token: your_verification_token_here
{
  "code": 200,
  "success": true,
  "data": null
  "message": "Account and all associated records have been permanently deleted successfully."
}
Visual Step-by-Step Guide
Visual Step 1: Navigate to Profile & Click Delete Button
Go to Settings, select Profile, navigate to the Account Actions tab, and click the red 'Delete Account' button.